DIY-Overhead Flower Drop

Tuesday, July 28, 2015


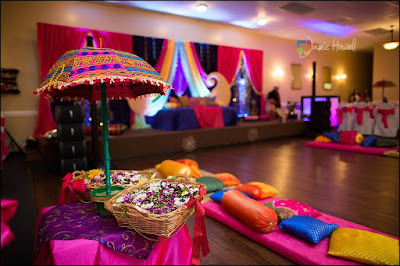
Although I have been married for about 2 years now, from time to time, I still get messages from current brides-to-be who may have seen some of my wedding event photos throughout the net or at a bridal show asking about some of the DIY's I had done. One particular DIY that I STILL get emails or messages about is the "overhead drop" that I made to walk under during my festive mehndi/sangeet event. I regret that I DID NOT take photos of each step during the DIY process (I was too busy being a over-stressed bridezilla to even THINK about taking pictures of the steps at the time LOL)...BUT, I did write out each step for you to follow! Enjoy and happy DIY...as well as Happy Wedding..or whatever event you are making this for!
Need:
-Basic lightweight curtain rods (2)---I used some old thin golden ones I had around the house
-Hot glue gun
-Needle and thread
-Pearl strings (found in wedding isle at Hobby Lobby)
-Fake flowers (I used fake daisy's found at Hobby Lobby)--I am sure you can use real flowers if you want BUT to me, those are just so delicate, I was afraid to "hot glue" them.
-Large soft satin ribbon (I used deep pink to match my theme)

Steps:

Step 1: Take your flowers a part (meaning from the bud--bc you only need the flower not the stick and leaves). The flower is usually made in layers and may fall apart. When this happens, use hot glue to glue the layers back together OR use thread and a needle to lightly stitch them together (like I did). Also, for the big flowers, I didn't worry about putting the yellow middle piece back in.

Step 2: Place your two rods opposite from one another as far as you like (on the ground). This will depend on how long you want your piece to be at the end.

Step 3: Take your pearl strings and start measuring out so it can be tied to each curtain rod on each side. I made sure to measure out extra since I would be wrapping the ends of the pearl string around the curtain rod to hold and would need a little extra to make it easy for me to wrap/tie. Also, put as many as you would like. I think I did about 10-12 strings so it wouldn't become too heavy.

Step 4: Once you have all measured pearl strings cut, it is time to tie/wrap AND got glue (to assure it is secure) around each curtain rod on each side.

Step 5: Time to glue on your flowers on the pearl strings (randomly but somewhat evenly too). This part can get tricky so when you are gluing each flower, try to make sure that you are gluing it at the bottom side of the pearl to assure when the entire piece is held up, most of the flowers are facing down. I think I may have glued some on top and some on the bottom to get the look I got.

Step 6: Glue some flowers along the entire curtain rod so you hide how you tied/glued the pearl strings on the rod.

Step 7: Take your ribbon and tie a large bow on all four sides of the rods. You can also add another flower to each corner to assure a "clean" look and to camouflage the curtain rods (lol).

Step 8: Lay flat on a firm surface to assure nothing gets tangled before your big event. When transferring to your event, fold in half and hold it.


I hope these directions were simple and easy to follow. Please contact me if you are confused about any step or have any questions. And, PLEASE do share your final product with me!! I would love to see how creative you got with your overhead flower drop.

xoxx-Nil

PS: Watch out for an upcoming post on DIY dandiyaa's and other quick and easy wedding/mehndi decor/DIYs! :)


All photo credit: Jamie Howell Photography 
More Photos of the event at Maharani Weddings

Garlic Spinach Chicken Pasta

Tuesday, July 21, 2015
let me just start off by saying i love italian food- if i could eat pizza & pasta everyday (and get away with it- i probably would)... but since life is all about balance (not to mention it would probably be super unhealthy), i switch my meals up. however, with that said, i have tried a bunch of pizza & pasta over the years from a ton of places and nothing compares to this recipe that i'm about to share with you all. it's very easy to make and i'm thanking Pinterest right now for this new fave meal. 

the original recipe had bacon, among other things; i took the recipe and recreated it w/minor changes to a taste that worked for me (made it twice already!)

prep time: 10 mins
total time: 25 mins (tops!)

ingredients: 
-penne pasta
-boneless chicken 
-crushed red peppers! 
-5 roma tomatoes/3 firm tomatoes
-2 cups of shredded parmesan cheese 
-1-2 cloves of garlic (varies on preference)
-2 to 3 cups of spinach (varies on preference)
-standard italian seasoning, basil (fresh preferred) & oregano
- 1 &1/2 cup half & half (or 1/2 heavy whipping cream, 1/2 milk- what i used!)


Preheat your convection oven/oven to 400 F.
Place a pot of water to boil (for the pasta).


 Take your whole tomatoes and chop them to a decent cube size that will fit into your chopper/blender (doesn't matter how they're cut because they'll be blended in a few). Add minced garlic, crushed red peppers, oregano, basil (fresh if possible), Italian seasoning and put in a convection oven on broil for 5 mins. Switch to bake for another 5 mins and remove. Proceed to blend/lightly puree and set aside. (this step really makes all the difference in this recipe since the garlic and tomatoes are not only baked together but blended as well = flavor overload)


In a large skillet, on high heat, heat 2 tablespoons of olive oil until hot. Add chicken and cook on one side on high heat for 1 minute. While it cooks, sprinkle the uncooked sides of the chicken with paprika, crushed red peppers & Italian seasoning. Flip the chicken over and cook on the other side for 1 minute on high heat. Repeat until the chicken is fully cooked & no long has a pink center. 
Remove chicken from the pan and keep warm. 


To the same pan (but without chicken), add tomato/garlic puree, spinach, garlic, crushed red pepper, 1/3 of the chicken (sliced into small strips). Mix everything.


Add half and half and bring to boil. Only after half and half starts boiling, add grated Parmesan cheese.


Immediately reduce to simmer and stir, until the cheese melts and makes the sauce creamy, only about 1 minute (at most 2 minutes). Then, immediately remove from heat. Season with more crushed red pepper and salt, if needed.


In the mean time, cook pasta according to package instructions. Add cooked pasta to the skillet with the sauce. Season with more salt if necessary. Slice the remaining 2/3 of chicken into thin strips. To serve, top the pasta with chicken strips and grated Parmesan cheese.


tag #thelipstickpantry if you recreate this recipe so we can see! enjoy! xo

Tell your friends & neighbors about Ramadan and Eid + Eid Goodie Bags &More

Monday, July 13, 2015
Photo: Karachi, Pakistan 2012
As a Muslim, one of the biggest celebrations in the Islamic calendar consist of: Ramadan and Eid (al-Fitr). Flashback to my childhood days, I remember being in Pakistan and India during the months of Ramadan or Eid and my surroundings were full of festive Ramadan talks and Eid celebrations. Flashback to about 3 years ago when I went wedding shopping in Pakistan, we were fortunate enough to be still there for the first few weeks of Ramadan and it was such a delight to be in an Islamic country during this holy month, especially as an adult, where I was able to soak in all the memories.  
In Pakistan this month is celebrated with numerous prayers and rituals. I remember the Men would go visit the mosques to perform prayers while the Women did the same at home. I would wake up to the sound of EARLY morning prayer Azan that was heard from a mosque miles away. Every morning special foods were served which are unique to this months breakfasts. A popular breakfast food that I remember being served in Pakistan (literally with LINES of people at the sweets dukaan/shop) was the Halwa Puri combo as well as cholay (chickpeas). Then in the evening people prepare special refreshing drinks made of rose water (raise your hand if the words "rooh afza" make your heart skip a beat!) and fresh lemonade, and many different kinds of deep fried dishes. The bazaars (shops) opened late and usually have a break during the evening prayers and then re-opened again till about 10 PM or midnight. I remember during the first few weeks of Ramadan that we were there, all restaurants, food stalls in the streets and even the "Paan shops" (lol) closed and it was frowned upon to eat or drink in public. 

And as for Eid...it is such a wonderful joyous celebration. Not just Eid al-Fitr but any Eid is a special treat for Muslims, and especially the children. Eid al-Fitr is a delightful 3-day celebration of breaking the fast. It is a time to give to charity and to those in need, and celebrate with family and friends the completion of a month of blessings and joy aka Ramadan. During these three days, muslim families donate food and money to charity, gather early in the morning in (usually) outdoor locations or mosques to perform the Eid prayer and sermon, and after the prayers, families usually scatter to visit various family and friends, give gifts (especially to children), and make phone calls to distant relatives. In most Muslim countries, the entire 3-day period is an official government/school holiday. 

Photo: Eid 2014 Goodie Bags + Money Envelopes 

Unfortunately, living in the US, it is difficult to celebrate Eid with such joy. With work, school and distance between many family and friends, Muslim children in the US don't always get the full taste of Ramdan and Eid as they would being back in their mother-country. But, there are always ways to make Ramdan and Eid special for our little ones. Something that I did last year for my nieces and nephews who are miles away from me was make Eid Goodie Bags. I stuffed the bags with various child-friendly goodies and candies. For me, this small act brought so much joy to my heart when my sisters sent me videos of my nieces and nephews opening up their bags. You can purchase SUPER CUTE Eid gift bags, money envelopes, decor HALAL gummy bear candies and much more at ModernEid (Click to redirect to site)

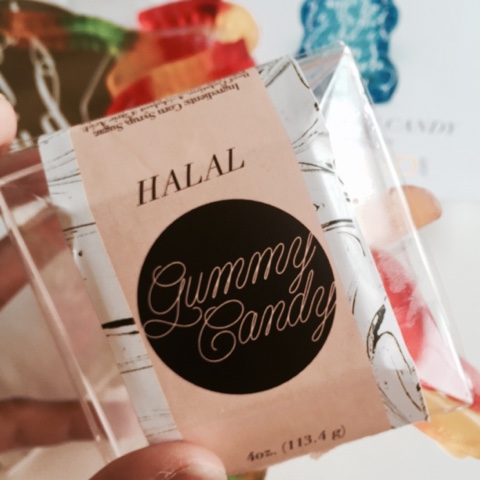
Ok, it can be so difficult to find halal candy sometimes! Especially when it comes to gummy candy, you must never know if you should eat it or not! Well, ModernEid made that ever so simple by introducing the HALAL gummy worms and gummy bears! These cute little acrylic boxes that the gummies come in SOLD me! How perfect are these not just for Eid but also for other party favors!! 


Last year, I had ordered the Happy Eid money envelopes, Eid Mubarak stickers and clear goodie bags. I then went to the dollar store and target to get my hands on various goodies for the kids. The sky is the limit with what you can stuff your bags with: candy, mini playdough, toy cars.airplanes, noise makers, rings, etc. Get creative! Also, make sure if you are mailing these out like I did, don't stuff the bags with things that are too heavy in weight. 

Modern Eid sent me a few samples of some of their newest items that I absolutely adored! See below: 


How cute are these Happy Eid paper cookie baggies?! PERFECT for treats for your Eid Sweets table go mini Eid gifts for friends, family or coworkers! 

I am absolutely in love with these gold Happy Eid banner stickers! These are PERFECT to jazz up straws for your party or even appetizer toothpicks! I may also put them on toothpicks & stick them in cupcakes to make my cupcakes look for festive! 

I hope you enjoyed this post on some Ramdan and Eid thoughts , highlights, & flashbacks and please share with us if you decide to put a smile on a child's face this Ramadan and Eid! We would love to see how creative you got! And don't forget to check out ModernEid for all your (modern) Ramadan and Eid needs this year! xoxx-

 Photo: ModernEid

PS- Make sure you are following both @ModernEid and @TheLipstickpantry on Instagram and Facebook! :) 


Peri Peri Chicken

Saturday, July 11, 2015


It has been one heck of a week (or really, 2-3 weeks) this past month. The holy month of Ramadan started, so I was trying to re-adjust to my new Ramadan routine and then my husband and I were scheduled to move, and the date fell on in the middle of Ramadan...wooh! Moving is overwhelming and stressful as is but add a full time work schedule + long full days of fasting, it can defiantly take a toll on your mind and body. It sure did for me. I have been extremely stressed out and sleep deprived the past few weeks and yesterday may have been my breaking point. Of course, "ain't nobody got time for that" (lol) so I had to pull myself together and I decided to make a to-do list to knock out a few things on my day off. After checking a few things off my list, I decided to get a head start on my iftaar meals for the final week of Ramadan (and also learned that cooking is actually very therapeutic for me!! Lol..I was on a roll!)---One dish that I made was the Peri Peri Chicken Kabobs! 

What is Peri Peri? Originated from the peppers of South Africa and later imported to Portugal---the word "peri peri" is referred to as "hot or spicy" sauce in Portugal. This "sauce" is popular in many foreign countries. Many people compare it the American BBQ sauce (obviously a way different taste though!)---A popular worldwide restaurant Nando's (my first time seen: Karachi, Pakistan few summers back) serves the popular dish Peri Peri Chicken. I don't think Nando's is in the US yet (I could be wrong though?)---but now you can give Peri Peri Chicken a try...with a little twist! Give my recipe below a try and let me know how it turns out for you---or if you add/remove anything in the recipe!

What Ya Need:
-About 2 lbs of boneless chicken breasts (cut into kabob sized cubes)
-Wooden Skewers (soak them in water for about 30 minutes to prevent them from burning when in the oven)
-Oven safe cooling rack + Baking trey (large enough to set cooling rack on top) 

Sauce: (Will be used as your marinate AND dipping/topping sauce after your chicken is cooked too!)
-3 red chili peppers (I wanted to use Birds-eye red chillis but I couldn't find those so I used Indian Red Chilli peppers---3---but I probably could have used more to add a little bit of kick to the chicken!)
-1 Red Bell Pepper 
-1/2-1 teaspoon of red chilli powder 
-2 tablespoon of Paprika 
-1/2-1 teaspoon of black pepper 
-1 teaspoon of salt 
-1 tablespoon of Oregano 
-2 and 1/2 teaspoon of minced garlic 
-3 to 4 tablespoon of fresh lemon juice (one whole large lemon can work)
-4 tablespoon of balsamic vinegar (VINEGAR NOT VINAIGRETTE)  
-1/4 teaspoon of red food coloring (I used liquid)
-1/2 cup of olive oil (honestly, if I made this again, I could lessen the 1/2 cup of oil to maybe 1/4. 1/2 seemed a tiny bit too much in my opinion. 

1) In a small chopper/food processor, blend/mix all sauce ingredients. 
2) Pour sauce in the chicken and mix it (don't pour ALL the sauce!...eyeball it and save some to use for your dipping and to pour some extra sauce on top once the chicken is cooked---(In my opinion, this is a must as it really gives the chicken kabobs flavor once they are cooked!)

3) Marinate in refrigerator for about 1-2 hours (if time, more or overnight)
4) Boil/cook off the leftover peri peri sauce that you made earlier on medium high to make thicker. (You will use this as your dipping sauce or pour some on top of your cooked kabobs later)
5) Turn on oven to Broil 
6) Thread chicken kabobs on skewers 
7) Place cooling rack on top of large baking trey and lightly spray rack with coconut spray oil 
8) Place threaded chicken kabob skewers on rack
9) Place trey in the oven about 3-4 inches from top (make sure broil is on) and set timer for 4 minutes. Flip skewers and put back in oven and place timer again for another 5 minutes. 
10) Take cooked kabob trey out of the oven and pour some of that leftover sauce all over the kabobs (or use as dipping for individual serving)
11) I added a pineapple too so when I was cooking the kabobs, I placed two slices (or pieces) of  pineapples on the baking rack and broiled with the chicken---don't worry, it won't burn!

Enjoy!